Tutorial
Click on thumbnailed images to enlarge
[center] - HOW TO CREATE BLINKIE BLOCKS -
This tutorial is my own creations. However, most of the techniques used in this tutorial, I have learned from others.
Let's get started!
Open a new image 250x30. Click on your "Preset Shapes Buttons" .
.
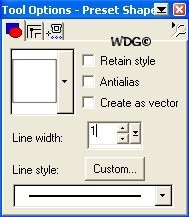
First, pick your own foreground & background color. I used purple - foreground & gradient purple - background. You draw a square. It's up to you how big but if you want to use mine. Follow these settings: You will find this number at the bottom on your left side.

Click on your "Magic Wand Tool" - Click anywhere in the outside area and you will see the "Marching Ants" around your box. Go to "Selections" - "Invert" - DO NOT Deselect.

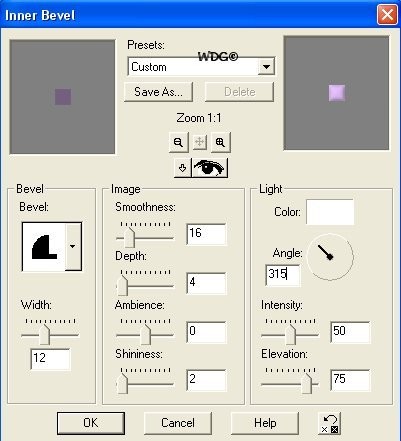
Now, go to "Effects" - "3D Effects" - Inner Bevel"...Follow these settings:
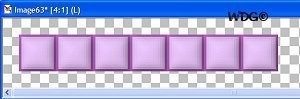
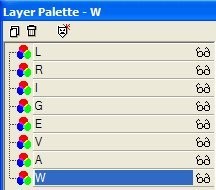
Now you can Deselect...Go to your "Zoom Tool" , Click 3x anywhere in your image. Now it's time to add your text. I'm going to put my name "WAVEGIRL" so I will use 8 letters. On your Layer Palette, the "Layer 1" name that layer to whatever letter you will be using first...For example, mine would be the letter "W".
Make a duplicate on your first letter and "Rename it" to whatever next letter you will be using. Use the "Mover Tool" every time you make a duplicate or add another letter to move the duplicate box to the right. And repeat the same step for each additional letter.
Once you have all of your letters in place and the box. Go to your layer palette and activate the first letter.
Click your "Text Tool" . You can select your own fonts and color. I used "courier new" size 8 bold. Type in your first letter and put it on your first square box.
*Remember, to click on each layer for each square.
Once you have finished putting all those letters on the box. Click your "Mover Tool". Move your first letter a little bit down.

Go to "Layers" - "Merge Visible"..."Edit" - "Copy" then "Paste as a new image"...Save your first letter as 1.psp
Now hit undo twice "Ctrl Z". Do the same thing to your next letter and save it as 2.psp, 3.psp and so on...
When you're done saving all the letters. Open Animation Shop. Go to "File" - "Animation Shop".
Use these settings: Same size as the first image frame (checked)...Transparent (checked)...Centered in the frame - With the canvas color (checked)...Yes, repeat the animation indefinitely - 20th of a second (checked).
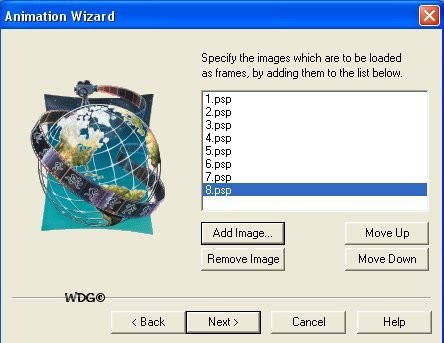
Add your image. Arrange them in the correct order.
Click "Next" - "Finished". Click the "View Animation"

Then you're done. Save your work as .gif
This is the result:

I made this other one too: Aren't they cute?

Hope you understand my tutorial...Let me know if you have any questions.[/center]
This tutorial is my own creations. However, most of the techniques used in this tutorial, I have learned from others.
Let's get started!
Open a new image 250x30. Click on your "Preset Shapes Buttons"
.First, pick your own foreground & background color. I used purple - foreground & gradient purple - background. You draw a square. It's up to you how big but if you want to use mine. Follow these settings: You will find this number at the bottom on your left side.
Click on your "Magic Wand Tool" - Click anywhere in the outside area and you will see the "Marching Ants" around your box. Go to "Selections" - "Invert" - DO NOT Deselect.
Now, go to "Effects" - "3D Effects" - Inner Bevel"...Follow these settings:
Now you can Deselect...Go to your "Zoom Tool"
, Click 3x anywhere in your image. Now it's time to add your text. I'm going to put my name "WAVEGIRL" so I will use 8 letters. On your Layer Palette, the "Layer 1" name that layer to whatever letter you will be using first...For example, mine would be the letter "W".Make a duplicate on your first letter and "Rename it" to whatever next letter you will be using. Use the "Mover Tool"
every time you make a duplicate or add another letter to move the duplicate box to the right. And repeat the same step for each additional letter. Once you have all of your letters in place and the box. Go to your layer palette and activate the first letter.
Click your "Text Tool"
. You can select your own fonts and color. I used "courier new" size 8 bold. Type in your first letter and put it on your first square box.*Remember, to click on each layer for each square.
Once you have finished putting all those letters on the box. Click your "Mover Tool"
. Move your first letter a little bit down. Go to "Layers" - "Merge Visible"..."Edit" - "Copy" then "Paste as a new image"...Save your first letter as 1.psp
Now hit undo twice "Ctrl Z". Do the same thing to your next letter and save it as 2.psp, 3.psp and so on...
When you're done saving all the letters. Open Animation Shop. Go to "File" - "Animation Shop".
Use these settings: Same size as the first image frame (checked)...Transparent (checked)...Centered in the frame - With the canvas color (checked)...Yes, repeat the animation indefinitely - 20th of a second (checked).
Add your image. Arrange them in the correct order.
Click "Next" - "Finished". Click the "View Animation"
Then you're done.
Save your work as .gifThis is the result:
I made this other one too: Aren't they cute?
Hope you understand my tutorial...Let me know if you have any questions.[/center]
Tutorial Comments
Showing latest 2 of 2 comments

sweet
By emmasawr on Jan 31, 2009 5:21 pm

i dont know why but mine came out blury...
By amyxbebe on Jun 15, 2008 11:18 pm
Tutorial Details
| Author |
Wavegirl
|
| Submitted on | Nov 13, 2007 |
| Page views | 12,082 |
| Favorites | 8 |
| Comments | 2 |
| Reviewer |
SinfullySweet
|
| Approved on | Nov 13, 2007 |